Wednesday 29 February 2012

Update: Dining Room Textiles

Remember when I wrote about textile choices for the dining room? If you're just tuning in, then check it out. Or not. Because it looks like things have changed since then anyway. While I finally decided on Waverly's Modern Essential 'Luminary' in Indigo, by the time I committed and went to purchase the fabric online at Joann's, the sale price of $9.99/yard was no longer. It had doubled in price to $19.99, and as of today, is longer even available for purchase. Hmph.

But I'm still optimistic that my dining room will look super now that I've not only chosen, but purchased (gasp!) 5.5 yards of a completely different fabric. Without further ado, here it is:
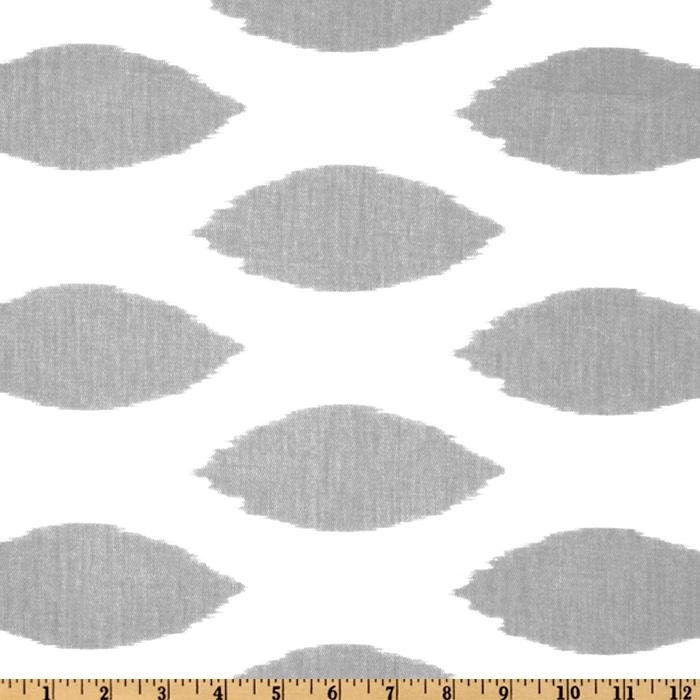
Premier Prints 'Chipper' in Twill/Storm ($7.48/yard)
 Ok, so there's no blue in it - I had really wanted something in cobalt or rich navy. Apparently, this pattern also comes in a lovely colour called 'Peacock' (which is perfect), but I couldn't find it for the $7.48/yard price tag that the grey version came with. Woo! Don't you just love the ikat feel to these little lemon-shaped blobs? Because, nothing says "Bon appetit" like blobs.

While I wait for the fabric to come in, I have to finish painting the dining room. The counter guy finally stopped by to re-apply the adhesive to our (defective?) vinyl counter tops, so I now have no excuse.

I can't wait to fill you readers in (hi, Ma!) on the making of the curtain panels. I've already warned my good friend, Kristen, that I need help. Serious help. She has the skills and the machine. I'm bringing the wine. Should be fun, so stay tuned!

Monday 27 February 2012

Protecting Your Dog's Paws

Are your dog's ... uh ... "dogs" barking? 

When was the last time you took a good look at your dog's feet? In case it's been a while, let's take a peek at this neat structure.  The bottom of your dog's front foot will have six distinct pads: four digital pads, one metacarpal pad, and one carpal pad (See image). Abrasions on these pads are fairly common, especially if your dog does a lot of running around on hard surfaces.


A. claws B. digital pads C. metacarpal pad D. dewclaw E. carpal pad
Originally, we were going to post about this earlier in the season, but it actually makes more sense to discuss your dog's foot pads now that snow is melting. Why? When the snow starts to melt, you'll likely begin to notice tons of sand and debris along the edges of the road and on sidewalks. Simply having the pavement make an appearance can mean injury for your pup's feet!
Fortunately, you have a few options for keeping your dog's pads in tip-top shape.

There are commercial products available to coat the foot pads before exercise. Many contain natural wax and are a safe choice for dogs. The wax provides a barrier between your dog's pads and the surfaces on which he walks. It won't however, moisturize the skin.

When you return from a walk with your dog, you may want to rinse his feet in warm water to remove any sand, chemicals, salt, or ice from the surface of his feet and between his toes. Mild soap isn't necessary, unless your dog stepped in something undesirable - just be sure to rinse off the soap well. The fur between the toes often collects a ton of debris. With clean feet, your dog will also have a better chance to avoid ingesting harmful things when he licks his feet clean afterwards.

Once your dog is at rest (for most, this is at night), give his feet a good once-over. Check for missing pieces of pad - these spots will appear smooth and pink. You might even notice some blood. Often, you'll find an abrasion when your dog is walking on snow and you see blood on the snow. Be sure to check the regular skin between the toes, too. Sometimes, a claw can nick the skin when a dog plays. If your dog still has his dewclaws on the front paws, look at those, too. Dewclaws can be torn (or completely removed) during boisterous play. While this isn't life-threatening, it can become a source of infection and will bleed quite a bit.

Again, while the dog is at rest (hopefully, ignoring you!), apply a thin coat of a moisturizer. Creams are best because they are thick. A word of caution: whatever you put on your dog's feet will likely be licked at some point - so choose only natural products. It may sound strange, but olive oil works well. You can also crack open a vitamin E capsule and apply its contents. Once moisturizing is complete, applying the wax will help lock the oil in place.

After a few pampering sessions, your dog's feet will be the envy of the dog park!

Have you found any unconventional or cost-effective ways to keep your pup's feet in fabulous shape? Drop us a line - we'd love to hear it.

{I originally posted this over at the Sault Dog Blog, a co-authored blog.}

Wednesday 22 February 2012

Your Hair Be Bangin', Yo!

*grooooaaan*

Oh, yes, I did just write that. Here's the deal: I had bangs in the 80's. Shocker. Who didn't, right? I was about six years old and they were heavily chopped straight across. All I remember about them was having a sweaty forehead in the summertime and collecting mosquito bites under that thick curtain of hair.

My outlook on this strange hair style started to change as I noticed more and more ladies on TV rocking the look:

Glee's character, 'Rachel Berry'
Zooey Dechanel as 'Jess' on New Girl
Hannah Simone as "Cece", also from New Girl

Katy Perry, as Zooey Dechan ... oh, wait. Nope. Just Katy Perry.
There are a lot more, but you get the idea. Then, my closest pal got bangs and she looked AMAZING. While I didn't want to rain on her bangin' parade (sorry, Kristen), I toyed with the idea that these things - in their modern incarnation - might actually suit me, too.

Armed with the jarring mental image of my giant forehead and this picture,:

I went and did it. And I like it. I'm also going to save money on facial bronzer now that I don't need to apply it to the forehead area. Yep, that's where my thoughts take me in the mornings. I'm a deep thinker.

So, where the heck did this style come from? We know that ancient Egyptians wore them, as did both men and women in the Roman Empire. Apparently, there are men and women wearing bangs in drawings dating back to the Middle Ages in Europe and Greece. They were worn both long and shaggy, and sometimes, quite short and almost not really there at all.
Hi, pretty girl! Egyptians knew how to rock the thick and heavy.

Nice bangs, bro. (Julius Caesar, ca. 14 AD)
While bangs fell out of favour in the Elizabethan era (hellllo, gleaming foreheads), they would make a high-fashion comeback in the Victorian era. After the turn of the 20th century, bangs or "fringe" have pretty much maintained their favourable position in hair fashion.

One could argue that the 1980's were an exception, mind you.

Me, ca. 2012. Watch out, world.


Tuesday 21 February 2012

How To: Make a Glass Globe Bird Feeder

Since winter really took hold, I've been meaning to start feeding the wild birds in the hope that they would hang out and let us look at them. The former owners of this house left a rustic bird feeder and proper bird house out back, installed on the shed. I threw some seed in that feeder, but decided that we need one in the front yard as well.

Once upon a time, we had a thick evergreen conifer growing on the corner of our front lot and it used to attract loads of birds. We loved watching the little chickadees poke in and out of the thick conifer, shaking the whole tree. As it turns out, that tree technically belonged to our elderly neighbour and, much to my dismay (anger), she chopped it down one day. I literally cried. My son was a wee newborn at the time, so maybe my hormones were partially to blame. But sadly, gone were the birds and any remnants of front yard privacy. We do, however, have a regular old tree that would be perfect for some bird friends to hang out in. It's not the same though. Just so you know, neighbour.

This project was inspired by a Design*Sponge post that I read. I made some minor adjustments to their DIY instructions, but it's pretty darn similar. If you want to make one, you'll need:

  • one glass globe (from an old light fixture)
  • rope (nylon is best, but I used twine)
  • clear silicone sealant
  • toothpick/other tool to apply silicone
  • scissors
  • pint of beer
The beer is optional, but highly recommended. I purchased my glass globe from the VV Boutique (a.k.a. Value Village) for $2.99, but you probably know someone who has a few kicking around their basement or shed. After rooting around my tools and such, I found our silicone sealant in a bin - it's an all-purpose, clear silicone rubber made by GE.


So, you'll want to make sure your globe is clean and dry before getting started. Trying to make something stick to a greasy or dusty piece of glass will probably result in utter failure.


I started by wrapping my twine around the "mouth" of the globe just because I like the way it looks. I then tied a knot in the twine at the top of the "mouth".

"You said there'd be birds, Ma."

I then ran the twine along the top of the globe, and kept going all the way around until it met the mouth of the globe on the other side. Then I wrapped a little more and secured the twine in the knot again. Before using silicone to glue the rope/twine in place, cut another piece of rope/twine and tie it to the top twine for hanging the feeder in place. 
Squeeze a generous beading of silicone under all the twine that wraps around your globe. You may want to add a little extra under the hanging piece (I did - the thought of a little birdie being helplessly trapped as the feeder crashes to the ground is a sad, sad thing). 

Before filling your feeder with seed and hanging it up, let the silicone cure for a good 24 hours. The instructions on the tube of silicone will probably say that it sets in half an hour or so, but don't trust them - this is serious bird business, not window sealing.

I think these feeders will look very nice if hung in an evergreen tree, because the contrast will make the bright white globes pop out. Ever since the evergreen massacre over here, I have no choice but to hang mine in a bare tree - at least until spring arrives. Whomp, whommmmp.


Come, my little friends!

A few days after hanging the feeder, we had literally dozens of tiny finch-like birds scrambling for the seed. I'd like to make a couple more of these feeders and see what happens then. 

If you try this project out, please leave a comment - I'd love to see all the different adaptations that are possible with this idea. Cheers!

Thursday 16 February 2012

The Beans, They Are A-Sproutin'

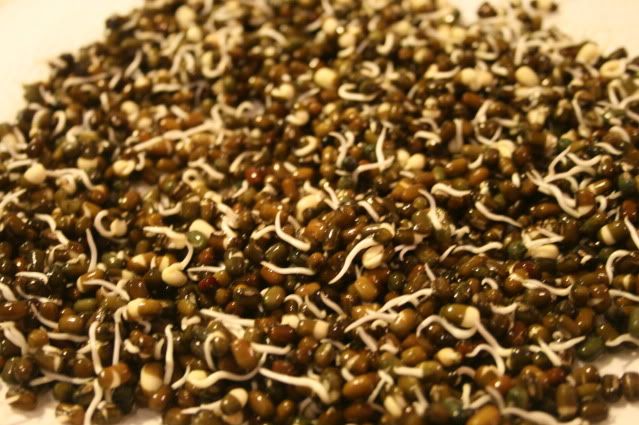
Urad dal (black lentil) sprouts
Last year, a good friend dropped by with a little foil box full of sprouts she had grown. "Put some on bread with a little mayo. It's SO good!", she told me. I did. And I loved it! Being a vegetarian in a meat-eating household means that getting the nutrients I need can sometimes be challenging - especially if I'm looking to add variety. But, according to what I've read, many sprouts are high in fiber, low in calories & fats, and contain a decent amount of protein*. Sold!

*For a more detailed nutritional chart, please click here.

So, after a little research (admittedly, not much), I decided it was time to try sprouting myself. I was inspired by Mumm's Sprouting Site, as well as a great organic farm called McFadden's Acres Organic Farms in Desbarats, Ontario. From these two sources, I gathered the information I needed and got to work. True to form, I disregarded half of their solid advice and sort of did my own thing.

I used the following:
  • glass jar with hinged lid
  • 1/2 cup urad dal (whole black lentils)
  • water
Pour lentil beans (or whichever seeds you want to use) in the jar and rinse through with water - to drain, hold the hinged lid open a crack. Pour in clean water and soak overnight.

After soaking overnight (or 4-8 hours), you'll want to rinse the beans again and drain over the sink. Prop the jar, slightly open, in a bowl to allow any excess water to drip out. Rinse the beans twice a day or so - if you forget, don't worry, because sprouts are really forgiving. 


Your sprouts can be ready in as early as 2 days, depending on the seeds you've chosen. You're good to go when you see little tails coming from the sprouts. If you see little white hairs growing from the tails, that's perfectly ok, too! Watching your seeds sprout is actually pretty interesting and kids love seeing the progress.


Check out the bounty!


Do you sprout?


Tuesday 14 February 2012

Abandoned Chair Makeover

Sometime last year (or was it the year before?), I found a sad looking and lonely chair at the thrift store. I couldn't ignore its mid-century charm and potential, so I paid the $5.99 price tag and took 'er home. I had wished there were some matching chairs somewhere in the store, but they were nowhere to be found. I always wonder about those singleton chairs - how did they get separated from the rest?

Pick me!
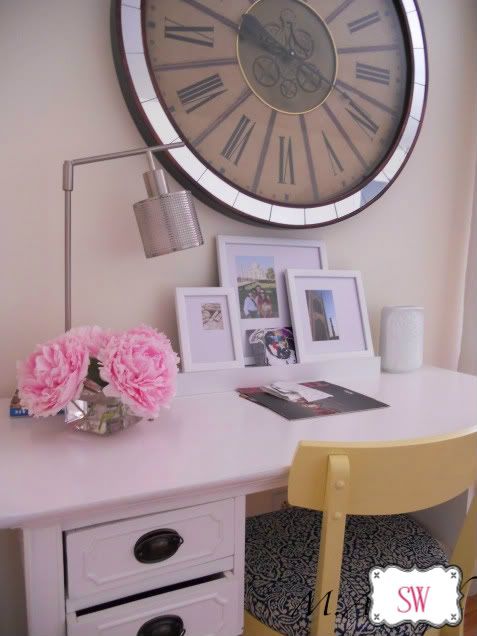
The chair sort of sat around until I figured out exactly what I wanted to do with it. I decided that the desk needed its own unique chair, so I chose a cream and blue Moroccan inspired fabric remnant (in the sale bin, of course!) and a quart of paint in 'Jonquil Yellow'.
The chosen fabric remnant and paint.

The most disgusting (and interesting) part of this project was peeling the existing fabric off the chair seat. After removing the screws that held the seat in place, I used pliers to pluck the heavy metal staples from the bottom of the seat. There were three layers of fabric on this puppy - it seems like each layer was from a preceding decade. How neat to see home decor fashions peel away before your eyes! If I had known I'd be blogging about it, I would have taken pictures of the layers. But, since I didn't take pictures, just think of the most hideous (and rough) fabrics you can. When I finally got to the foam beneath the fabrics, the padding was disintegrating! Foam quickly turned into dust as I handled it. Gross. GROSS.

I traced the naked wooden seat on a large piece of new foam (most fabric stores carry different thicknesses of foam for upholstery and pillow-making). I used a 2" thick piece, which was just a personal preference. With a serrated knife, I cut a new piece of foam for the seat and stretched the fabric around it. I then secured the fabric in place by stapling it to the underside of the seat, making sure it was smooth after every staple or two.

The next step took quite a long time. I sanded the frame of the chair multiple times until I was satisfied that the paint would adhere properly. Over a few days (during baby nap time), I applied four thin coats of paint to the frame.


Mom says they look like little cowboy boots.
For me, the fun thing about giving furniture makeovers is that you discover unique oddities about each piece. For this chair, it was it's adorable metal leg caps. I wasn't sure I was going to keep them (I thought they were weird and ugly at first), but they totally grew on me and now I love them.


At home, in front of my desk.

I love seeing furniture transformations. Have you undertaken any lately?

Sunday 12 February 2012

Let There Be Light!

Waverly Modern Essentials - Luminary
While the dining room is definitely the happening project at this moment, I have to say that I am taking my sweeeet time completing it. There are a few reasons.

First, I took a trip to Joann's Fabric to pick up a few yards of their Waverly Modern Essentials Luminary in Indigo (at right), but they don't actually have it in stock. Hmph. I'll have to order online and wait before I can make curtain panels.

Second, due to (what I'll assume) is a fluke fault in the construction of our counter tops, we're waiting on the company to come in and repair the damage before I finish painting the kitchen/dining room. That won't be until the end of this month, but that hasn't stopped me from browsing for the room's final touches while I wait.

To recap, this is what the dining room currently looks like:


As mentioned above, that back wall will be painted and the curtain panels will go up - albeit, about six inches higher than the boring ones in the picture above.

There's nothing like a fantastic light fixture to completely make over the feel of a room. The light it throws and its physical presence can ultimately change the atmosphere! No pressure. See what's currently happening in the fixture department? Oh boy. Here are a few better options I've been eyeing ...


1. Turning Pendant in White/Natural, West Elm ($124.73)
2. BOJA Pendant Lamp, IKEA ($59.99)
3. Cluster Glass Pendant, West Elm ($166.65)

I have a feeling this will be the final detail to be completed in the dining room. Let's be clear about something: electrical work is absolutely not a strong skill for either me or the man of the house. In fact, the last time we needed a simple fixture installed, we ended up calling the neighbour over to help. Since he works for an electrical company, we were thrilled. But, as it turns out, he's a salesman ... not an electrician! Woo, boy. (No worries, though. We got a legit electrician to check it all out and it was just perfect.)

To be continued ...


Thursday 9 February 2012

Deal Steal: Drapery Rings

Oh, man. Nothing makes me more giddy than finding what I need, on sale ... without even looking. On a trip to Liquidation World today, I found tons of packages of umbra cufflet drapery clip rings in a multitude of finishes. I chose to buy two packages of the black rings to hang onto until I finally bring home fabric to make drapery panels for the dining room.

umbra Cufflet Drapery Clip Rings (in antique bronze)
 Normally, each package of 7 rings costs about $10 and I only paid $3 each. I know that doesn't sound like a crazy steal, but when you multiply by two, that's only $6 for enough drapery rings for an entire window as opposed to $20!

Maybe it's an omen - I guess it's time I got on that fabric purchase ...

Monday 6 February 2012

Personalized, Mossy Wreath

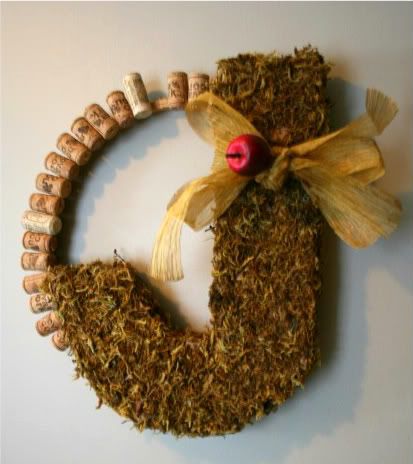
I drink wine. Sometimes, quite a bit. Since we started making wine last year, that usually means that we have corks everywhere. And lots of them! Since they can't be re-used to cork our bottles, we've been collecting them for other things. Inspired by a Pinterest pin, I set out to make a personalized wreath for our front entrance way.

Ignore that missing cork, ok?
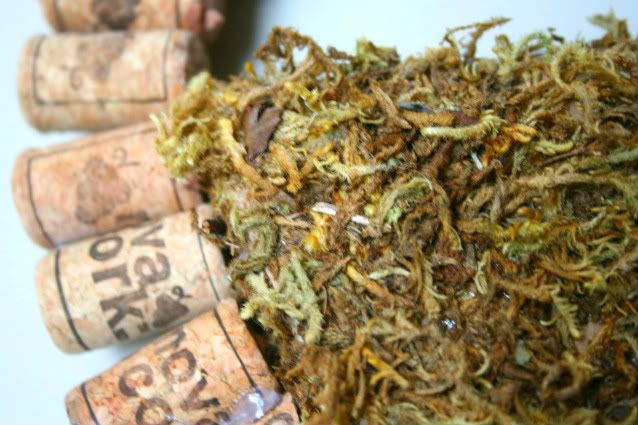
At the time I started to make this wreath, winter was just starting, so I was itching to keep a little greenery around. In my opinion, moss is one of the most comforting types. It's soft and fluffy! The dollar store has bags of dried moss (and some tiny twigs mixed in), so I bought a few. But, to be honest, those little bags are stuffed pretty well, so I could have easily just bought one.

Using some leftover cardboard packing material from my daughter's new daybed, I carefully cut a giant "J" and affixed some moss to the form with hot glue. When hot gluing this moss, be very careful of your little fingers - moss isn't very dense, so there are deceiving gaps where the glue can peek out and burn you!
Sweet, sweet dollar store moss.
 At Value Village, I was way too excited to find a set of embroidery hoops for 99 cents ("excited" and "embroidery hoops" probably don't belong in the same sentence together). So I hot glued the mossy "J" to a hoop and got to work gluing a bunch of my collected corks around the rest of the bare hoop. Luckily, our wine store still uses real cork and not the composite ones. The true cork has such a nice texture and smell.

Again, at the dollar store, I picked up some gold-threaded ribbon to make an accent bow and tucked a little faux apple in the knot for some colour. The apple actually fell out of a Christmas decor box while we were moving stuff around in the basement - I take these omens seriously! Because, I am weird. Let's call it "quirky". So, on the wreath it went.

A word of warning when working with this mossy stuff: it gets everywhere. Since it is really just made up of lots of tiny bits, expect some "shedding" when you move your project around.


Friday 3 February 2012

Is That Your Poker Face?

There comes a time when your kids grow up and you become a little less cool everyday. I think I dropped down about twenty notches on the 'Cool-o-Meter' today. Even bringing up the mythical 'Cool-o-Meter' probably makes me even lamer than I was earlier today.

In a burst of energy this afternoon (thanks to a P.D. day), I told my daughter to put on some Lady Gaga because "Mama wants to dance!". I know - that's what every kid wants to hear. So I start flailing around to Gaga's 'Poker Face' like a drunken college kid, much to the delight of my toddler. He's wiggling back and forth and loving every minute of it. Yay! Then, in a typical turn of events, I whack my knee off the kitchen cupboard door and do one of these:


Go, Mom.

Trying to save face in front of my toddler, I settle down and ask my ever-scrutinous 9-year-old daughter to pick some music and she chooses Adele. I suggest 'Hometown Glory', at which point she gives me this face:

Kristen Wiig, impersonating my incredulous daughter


... because that song is old. OLD.


Ok, then. I guess that kid is staying the heck away from the horror that is my iPod. Can you imagine the contorted face that would accompany her discovery of my Bob Dylan collection? Oh, vey.

It looks like I've got to pull up my leg warmers, put on some Katy Perry, and redeem myself.